Saturday, July 23, 2011

Renewed & Great Find: Dining Room Table with Chairs

Scratched/Scuffed table-top
People are on the move again! I found this great table scratched and scuffed and dismantled from its legs.  The structure and lines of the table attracted me to it and once I tried to pick it up to transport, I realized that it weighed a lot and therefore it was solid wood. Oddly enough the table almost looked like it had a Cherry Wood finish where the legs and the chairs were completely different. Yes, very odd indeed!
Legs after marbleizing

After a good cleaning with Tung Oil and a few hours of thorough drying, I took an old t-shirt and dipped a small portion of it in my trusty can of black indoor/outdoor paint. With varied strokes of paint, I began to add a marbleizing effect by hand and often times put my fingers in the paint and spread it around as unevenly as possible. I started with the table legs first and loved the finish outcome: This was my test as I wasn’t sure what the results were going to be. I loved it!
Table-top after marbleizing
With such great results, I naturally continued to work on the table-top which needed much longer strokes in a consistent, but erratic pattern because there was more to cover. The result was beautiful; it toned down the brighter Cherry Wood coloring and the black marble gave it a richer appearance.

When the table-top and the chairs were completely dry, I added one coat of Minwax ™  Fast-Drying Polyurethane to the table-top for daily-wear protection. Yummy!

Too cool! By the time I had finished the table, the chairs were a piece of cake!
Check them out!

Close-up of newly-marbleized chair back
Great new marbleized chairs
Cool new dining table after 1 coat of Polyurethane
Ooops! I completely forgot to mention...The chair seats had a yellowy-greasy and definitely dirty plastic cover on them. However, when I took the covers off...the seats were in IMMACULATE CONDITION and needed no help from me! Yeah! I am going to make a couple of cute seat covers to throw over these and make sure they stay super clean! :)
Cost to me: <$5.00 for the can of Polyurethane

Wednesday, July 20, 2011

Sharing: Handmade Toys I've Created

2009 was my year of an entirely handmade Christmas...Sharing a couple of toys I created for two of my granddaughters.
Butterfly Pull Toy on Wheels

6 Puppets and Puppet Stage card table cover-up
Handmade ensures memories that last a lifetime!

Renewed & Repurposed: Old vanity table spruced up as a writing desk

My teen-hood vanity table of yester year 
When I was about 17, my mom surprised me with this table. She added a mirror on the wall and yahoo --- I had my own vanity table! I loved it, but as time when on - the table became useless and as of lately...it's been in the kitchen as a catch all.

Redesigned retro-chic writing desk...chair to follow!!
So, I dumped the stuff that was useless clutter and I spruced it up by giving it a new design, paint job, and new purpose. As soon I re-upholster the matching chair...I will have a new writing desk!

The big black dot on the table-top is a painted on coaster!! LOL!

Sooooo cool! Enjoy!

Cost to me: Approx...$2.95 + tax (sample size can of Behr paint from Home Depot) and I already had the semi-gloss indoor/outdoor black paint.

Thursday, July 14, 2011

Handmade One of a Kind Rag Dolls

Samurai Dolls

I just wanted to share a few pictures of dolls I make and sell, and often give-away! There is absolutely no sewing involved. These are stuffed, tied, gathered, and hot glued!

Each doll is signed by me, given a unique number, dated, named, and comes with a certificate of authenticity! You'll love your doll!


You can purchase an existing doll in my Etsy shop at http://bluemoonshadows.etsy.com
or custom order a special doll with your own specifications.

Enjoy! 

How-to-make: Journals for every occasion


When you see an article or a picture of something you just luv – What do you do? You know what I do? I tear them out and paste them into my “Things that make me say – AHH!” journal.  I tear out décor ideas, color combinations, travel pics, home interiors, house exteriors, plants and flowers that catch my eye, items I want to buy someday… and I make notes alongside each picture, ensuring I always remember why I placed that tear sheet in my book in the first place! These are the things that make me say—Ahh!

Another great idea is a Gratitude or Memories Journal…where you jot down all that you are grateful for and maybe dedicate those thoughts to someone special.  Or you can make a holiday, recipe, gift idea, or sports, travel, quote, friendship, fashion, trend idea, school notes, color, paint chips, baking, prayer, special moments, birthday, green/energy ideas, renewed & repurposing possibilities journal. How about a road-trip journal...where you went & your favorite vacation spots, or a party journal...with meal planning ideas, actual menus, decorations, what was prepared and for what occasion, or how-to instructions and picture books, personal poetry and special thoughts, goals, and more goals! Why not make a garden journal - as gardening is SO IN nowadays...what you planted, when, what grew and what didn't and why it worked or didn't work, etc.- Whew...I think you get my drift! Right? Yeah!! I KNEW IT!

Here’s what you’ll need:

1.  One composition book… Buy it from the 99 cent store and save money, especially if you’re just going to paste magazine pictures and stuff in it. However, if you’re actually journaling and writing in your book, you may want to purchase a real composition book from a store where the lines on the pages are printed clearly…hahahaha! But, I luv the 99 cent store and have found really cool deals there!

2.  An ironed Fat Quarter from Joann’s or an 1/8 of a yard of your favorite fabric

3.  3M Super 77 Spray Adhesive (that’s super-duper Industrial strength – LOL!)

4.  Double-sided scotch tape (any size)

5.  Hot glue gun

6.  Once you know what theme or purpose your journal will have…Search for a handful of corresponding or descriptive words & decorative images to cut out from magazines or greeting cards.

7.  Gather anything you can use to embellish your cover…i.e., yummy paper scraps, pretty ribbon, old greeting cards, printouts from your computer, dried flowers and/or leaves, buttons…etc.  


Let’s get started:
Click to play this Smilebox slideshow
Create your own slideshow - Powered by Smilebox
Customize a slideshow

Tips:
* First iron your fabric

* Don’t forget to allow at least an inch all the way around before you cut. Darn it, I’ll just give you the measurement! Cut a rectangle approximately 17.5”x12.5” if you’re using the standard B/W composition books we all used in school… once upon a time. LOL!! 
* Read the directions on the back of the can before spraying and do this with caution because the sticky stuff can get all over the place. Make sure there is no wind in your direction or it will blow the adhesive back at you. L
 
Yeah! Your journal is almost ready! Now wrap it up or start using it!! 
Happy Journaling!!


    Cost to make: <$2.50 (includes the composition book and FAT Quarter on sale from Joann’s) Additional costs you may incur might be for the adhesive spray and the double-sided scotch tape, if you didn’t already have them at home plus any embellishments. However, the latter could simply be from recycled gift-wrap paper, old greeting cards, or old magazine tear sheets. Always –ALWAYS, look around your home for new ways to make-do with old items!!
Handmade ensures memories that last a lifetime!

Saturday, July 9, 2011

How-to-make: Silk Flower Napkin Rings


A great gift idea that’s elegant, simple to make, and wonderful to treasure!

Here’s what you need:

1.  Hot Glue gun

2.  1 or 1 ½ “ wide interfacing cut in half length-wise or keep the size as is and buy the amount you want…get a  1 yard

3.  1/8 yd of silk or fabric of your choice for napkin rings

4.  1/8 yd contrasting fabric for leaves

5.  1/8 yd of organza for the flowers

6.  1 small crystal or button for the flower center *I used Swarovski crystals, but you don’t have to.

7.  A candle

8.  Thread and needle
9.  Mod Podge™ and a small brush

Instructions:

Flowers

1.  Cut multiple circles out of organza fabric not more than 3” in diameter …you don’t need to be precise in the sizes, allow 4-5 circles for each flower.

2.  Light the candle and carefully hold the organza above the lit candle so that the heat barely singes the perimeter of all the circles…safely turning each circle quickly ensures even gathering and  the singe will give you different patterns and sizes too.

3.  Thread your needle and sew the center of 4-5 circles together…add a crystal or a small button to the center and tie… Make the number of flowers you want for your napkin rings…and you’ll end up with 4 or 6.

Napkin Ring

1.  Each napkin ring will be 6 inches long, so multiply 6x4 (24”) or 6x6 (36”) depending on how many you want to make. Cut the interface band the length you need.

2.  Cut the silk or fabric of your choice in strips larger in width than the interface band…you’ll be wrapping the interface with the silk or fabric of your choice.

3.  Heat your glue gun at this point

4.  Begin to wrap your interface band fabric with the silk or fabric of your choice and iron carefully if needed to get a nice crease.

5.  Begin to fasten with a thin line of hot glue. When the entire strip is completely done, cut into sections of 6” each in length.

6.  Form a circle with each 6” section and glue together to secure the circle overlapping the ends


Leaf for each flower

1.  Cut top and bottom leaves whatever size you’d like

2.  Brush a thin coat of Mod Podge™  on one side of leaf and place in a ventilated area…when dry coat the other side. This will make each leaf stiff and pretty shiny.

3.  When all your leaves are finished and dry…

4.  Hot glue 1 leaf to the napkin ring seam and press in place… do this to all napkin rings.

5.  Next put a couple of hot glue drops on the leaf and glue a completed flower on top of the leaf. Do this for all napkin rings and then gift wrap to give away or use that same day and enjoy!

Cost to make: Price depends on the type of fabric used
Handmade ensures memories that last a lifetime!

Friday, July 8, 2011

SPECIAL Great Find Repurposed: 1937 Vintage Dining Table turned into my modern day desk

My new desk...Isn't it beautiful??
Can you believe how great this finish looks at age 74!!
Golly, I hope I look this good next year!

For almost a year, I had been on the hunt for ideas for a really chic desk for my bedroom. However, I wasn’t settling for just any old desk… No!! Not me…so I waited and looked and waited and looked and finally came upon an idea. I was going to have a clear glass top propped up by sawhorse legs. Not really my own design, but I thought it would look very cool! The problem was that I started to look out for the sawhorses and wasn’t very successful.  One day on my daily neighborhood run, I saw a table out by the trash, propped up against a very big tree, with the extension leaves in a pile off to the side. I glanced at it and continued along my run: After all the paint was chipping, the table top wood was warped, and basically… it was in really bad shape. It was a couple of days that had passed when I purposely ran by that same location and guess what??? No one else wanted that table! So, I ran home and asked my neighbor to help me secure the table and we attempted to fit it in her SUV, without success I might add. However, in looking it over a bit better I noticed it had little wheels, so yup you guessed right… I pushed it around a few corners and into our complex parking lot. Man was that a screechy endeavor!!  By the time I had it in my parking spot; I noticed I had lost one of the wheels…oh well! Duh! No wonder it was screechy.  LOL!!!

Cool metal claw feet hide little metal rollers
Company Name: Perfection Table Slide Mfg. Co in Wisconsin
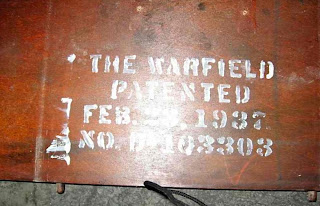
What I did next gave me the complete idea I had been searching for.  I dusted it and noticed that much of it was really beautiful and only the top had really been destroyed.  I naturally removed the table-top and exposed those gorgeous legs! When I put the table-top pieces on the ground, I noticed that there was a stenciled patent number, company name, city name, and date…it was 1937!!! I had just taken apart a vintage treasure!! Gosh, too late. I simply loved what I had found and once I pulled what should have been the base for the table-top leaf extensions…the wood was in supreme condition and my table was created! All I needed next was a glass table-top!

The Warfield...Dated Feb. 23, 1937
written on the table-top underside

I saw a message on Craigslist that said, “I’m slowly getting rid of my storage items, such as…” and the list started and my eyes stopped when it read…”5 foot beveled glass table-top.” I called and met the woman at a Public Storage facility and I purchased her piece of glass for $20.00 and the rest is history… BUT I WAS SO JAZZED!

Cost to me: $20.00

Sunday, July 3, 2011

How-to-make: Transferring your pictures to fabric!

Actual photograph on the left & Printed fabric on the right
Fabric was ironed onto Freezer Paper before printing

Supplies needed:

1.  Reynolds Freezer Paper (comes in 50SF/75SF and 150SF)...I recommend the 50SF because it's 15" wide and you'll waste less. The price listed is for 150SF size.

2.  Your favorite picture

3.  Muslin or a light-weight and light-colored fabric where the image will end up

4.  An iron

5.  A home printer

What to do next:

1.  Cut your freezer paper and fabric to 8 ½ x 11” in size

2.  Place your freezer paper film side down onto cut fabric

3.  Iron at a fairly warm setting on the paper side (this way the film will not get onto your iron in any way…so REMEMBER don’t iron on the fabric side or you’ll be cleaning and maybe even destroying your iron).Make sure and iron with even strokes ensuring all edges are sealed together.

4.  Scan your picture and have it handy (save it to your desktop for now).

5.  Take your sealed fabric/paper combo and place it into your printer in manual feed. IF you do not know what side your print will show up on… do a quick test by feeding a blank sheet of paper with a hand-drawn X. Feed it through and see what side your print comes out on. Remember what side your paper was fed through and do it again, but this time with the fabric side so it gets the printed end result. Most of us have done this test for some reason or another, so I have great faith that this test will be a simple one for you. J

6.   Open your picture file and hit print… Depending on how much ink you have or the density of saturation in the original picture…that’s the result you will have.

7.   Hooray!!!  Your picture fabric panel is ready to use in any project!

I am really BIG on genealogy, so my panels were used in making soft family genealogy booklets. And my apologies...I had already given them away before the began this blog. So, who is that lady in the picture??? That was my mom at age 18! In those good old days gone by!! Boy, do I miss her...
This can be a really great family project all could do together!

NOTE:  Your print result will always be 8 ½ x 11 because it must go through your printer. Should you want a larger image…you can always secure to a large piece of fabric for larger projects by sewing or gluing.

Cost to make:  <$9.00 and your cost could be a lot less if you make multiple projects.

This includes the Reynolds Freezer Paper…150 SF at Walmart <$6.00 (and you can make lots of projects) and using a FAT quarter of fabric from Joann’s about $0.99 if on sale or $1.99 if not and you already have the printer ink and your personal elbow grease to get the job done!

Mark Montano, artist and author recommends TAP (Transferring Artist Paper)...I've never used it, but will on my next photo project!! Thanks Mark for that recommendation! 
Handmade ensures memories that last a lifetime!

Saturday, July 2, 2011

Renewed: Chairs

Wow...See this chair! I found 4 of them - someone moved and left them behind just for me!... And guess what?? They're practically new, just dirty seat cushion tops and a few scrapes, but other than that...another great find!! As it happens often, I jump into another project and forget to take the before picture. So this one is not the one featured at the moment, but one you'll see later on. Nonetheless...it's in this same group of chairs.


Look at the bottom of the cushion...it's super clean and proves they weren't that old nor so worn out...Truly another great find!! Actually everything I find is a great find...especially if I could do something fun with it. What have you renewed lately?? Do tell...


The first thing I did was decide on the fabric I wanted to use to recover the seat and the color AND THEN -- I bought the paint for it. As always...I clean the wood with a wood solvent to ensure all the original dirt and grime is completely gone. After a few coats of paint and new seat covers...here's what I did! BTW...I renewed 2 chairs like this! Woot! Woot! OMG, they're sooooo cool!!


Cost to renew: <$15.00 for 2 chairs ($4.99 yd of fabric + about $8.00/qt of paint and I borrowed a few heavy duty staples from a neighbor! LOL!) BTW...I didn't use the entire can of paint on these 2 chairs...there's plenty left and I've used the paint on other projects as well.

Friday, July 1, 2011

How-to-make: Family Tree Framed Art


Are you into geneology? Do you know your roots? I am constantly digging into my family ancestry and encourage all of you to do the same. A great place to go is the Mormon Temple...in Los Angeles, CA it is on Santa Monica Blvd., just east of the 405. They have a fabulous family center where ANYONE can visit and use their computers, books, microfiche machines, and even get lessons as to where to start. I luv it there and it has recently been renovated, so I am anxious about getting back there soon! They welcome all denominations and won't try to convert you...PROMISE!

Meanwhile, I've made this family tree frame as a gift and gave it to my youngest son and his wife. It's very easy to make too; however what might take time is getting all names on the tree. Our family was easy, but some won't be. 

Here's what you need:

* 1 8 1/2 x 10" frame with or without a mat...I took mine out, because my background textile art ended up a bit larger than it could have been
* fabric and ribbon scraps...don't buy anything new...use what you have
* specific fabric or ribbon dedicated in making the tree itself
* Family names printed out
* Mod Podge 

What you do...

Before you start...sketch a tree on paper and place names on it, so you'll have some sense as to how large this will turn out and then continue...!

1. Create a textile art piece as your background...I made waves of color, cut a round circle of white fabric and made a moon and then added ribbon and yarn as I created. And as you can see, I left the fabric without finishing the edges...I believe unraveled looks more artistic in some projects. Here, I used some sheer fabrics where it made sense to leave it alone. You can get a clean cut on other fabrics such as cottons.
2. Fold pieces of fabric in cones for the tree stump and branches and add more branches than you actually need. OR use ribbon to make your tree. The folded fabric gave it dimension and ribbon will be flat...it's up to you what you decide to use. Both will be fine...get creative and use whatever else you conjure up creatively. Also, if you want you can use thin pieces of actual tree --- you'll just have to omit the glass in this case. Hmmm on second thought...scratch that idea. It's not such a great idea after all, as it will be hard to dust without destroying it in the process! :(  Ugh! LOL!!
3. Using glue...add all your pieces to your frame background.
4. If you want, you can add a layer of Mod Podge  to give it some shine and protection.
5. Then, begin to add the typed family names in place with glue.
6. Replace glass, hang, enjoy, and smile at your accomplishment or do the latter and also give as a wonderful family gift!

Cost to make: <$15.00 if you use a coupon to discount the cost of the frame or about $20.0 if you don't use coupons!

Handmade ensures memories that last a lifetime!